Muses Pot with Display
realized by Frank Wilker
This project description will be further supplemented!
last change: 18.01.2021
- design by
- Frank Wilker audio-perfect.de
- posted at 09. June 2020
Description
After the Muses volume control Stand Alone works perfectly, here is the next variant: An Oled display will do the visualization.
A display allows me to implement a balance control. Not so important for me personally. But for the sake of completeness I would say that this is part of it.
What should the visualization look like?
- Volume
- Balance control
- Mute
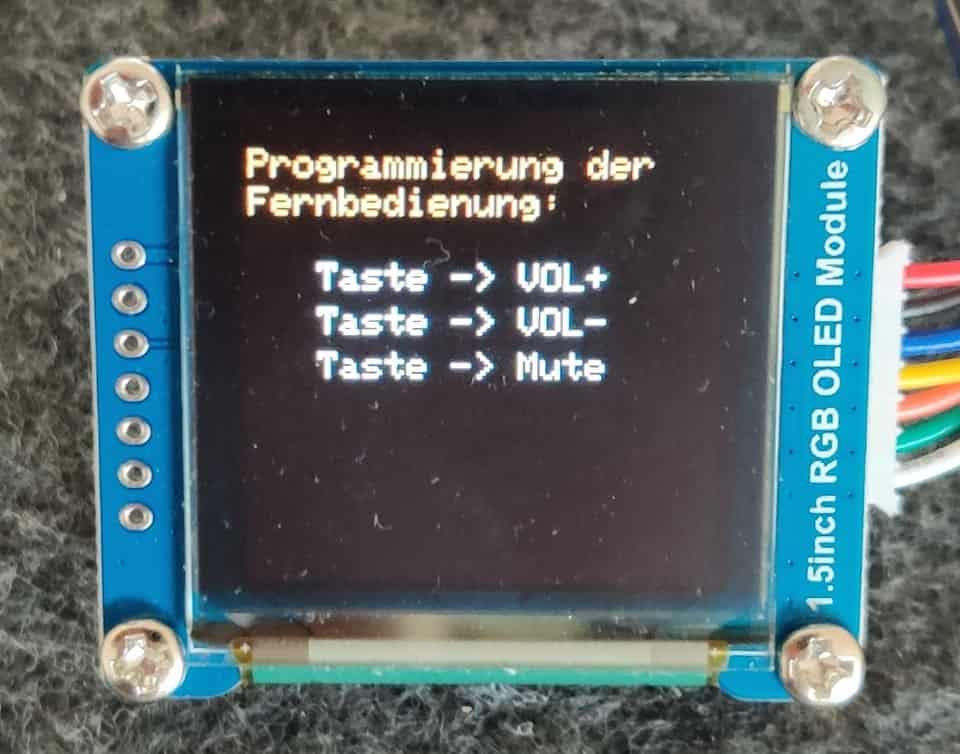
- Programming the remote control
- Setting the step
- Info display / Options
to be displayed:
In magazines, online or even in direct contact, one encounters a wide variety of solutions. When the decision was made to use a display, I had of course already thought about the presentation. So now I decided to use a combination of graphics and directly readable display. In this section I will describe the individual points only briefly, since the explanation of the software will contain all necessary explanations.
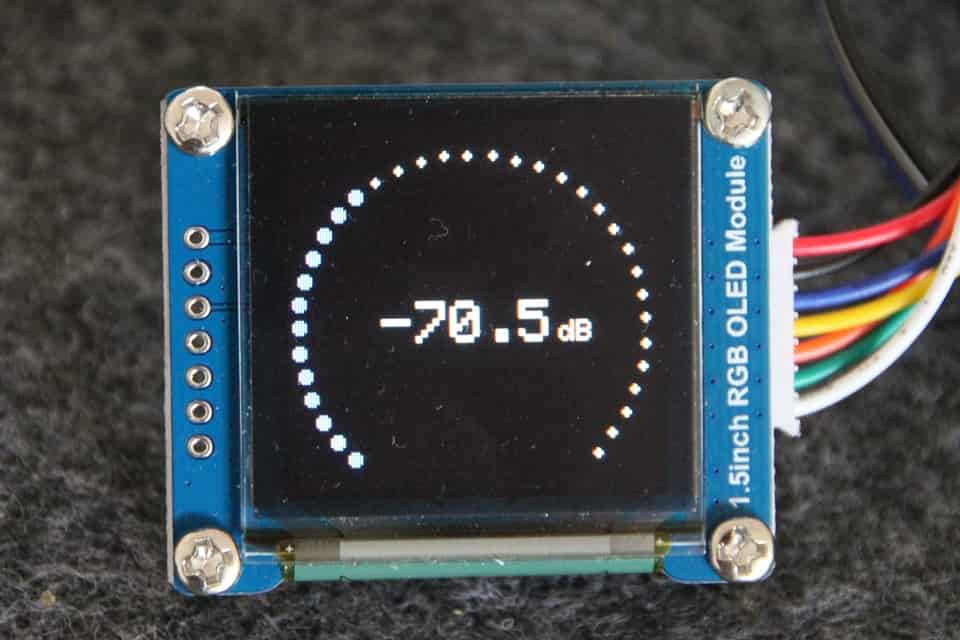
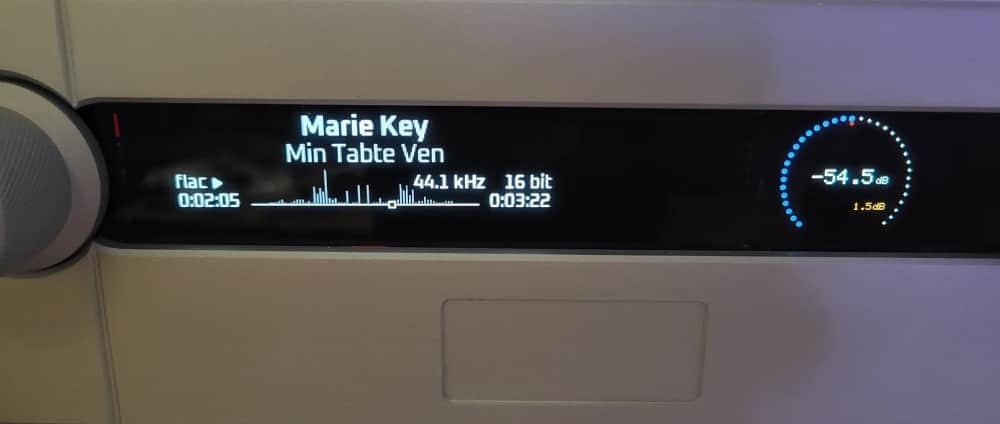
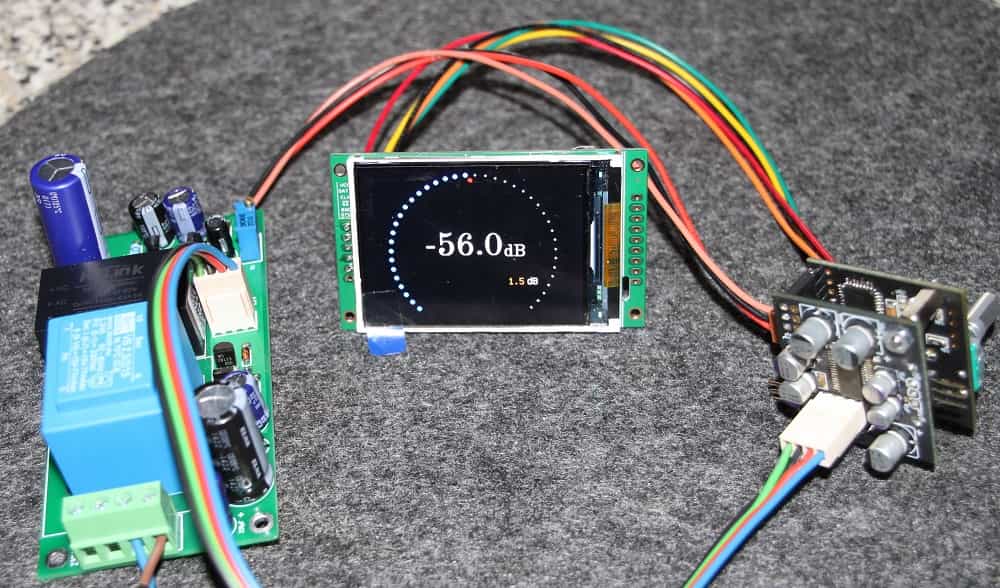
The most important thing is of course the actual function of a volume control; the display of the volume. The dB value transmitted to the Muses chip is directly output in the middle of the display. The graphic display consists of an open circle (approx. 270 degrees) formed by white dots. In proportion to the volume increase, the points in the direction of rotation get a different color.
The balance control is performed in a similar way. The values are displayed in percent. Visualization is in red and also in circular form.
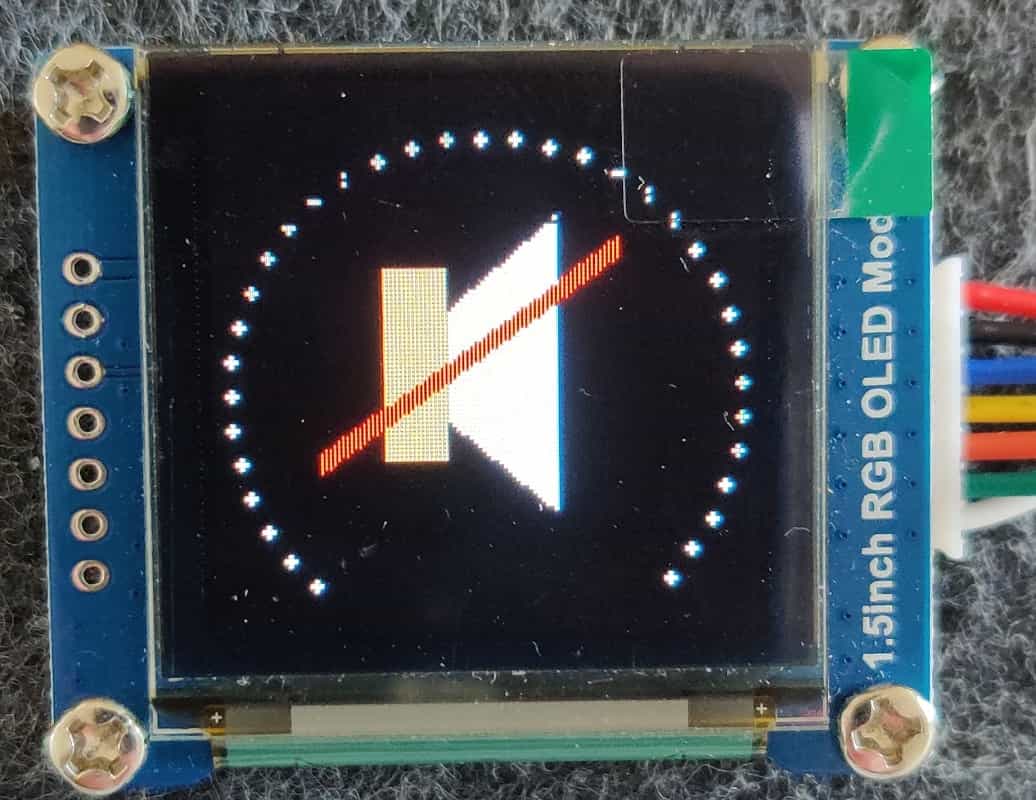
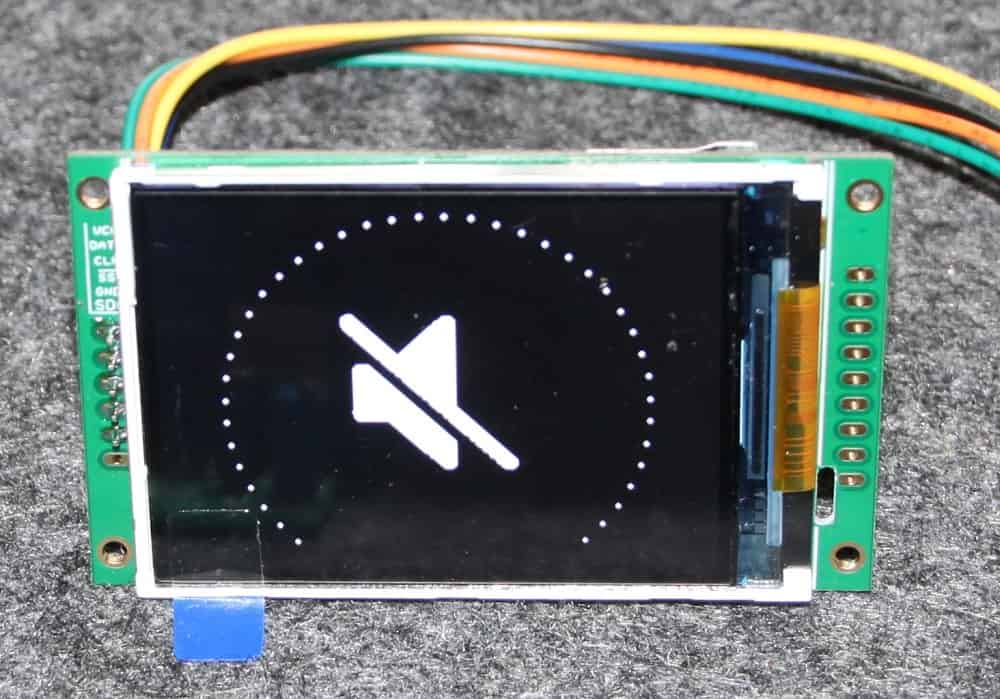
The mute function is displayed in the form of a pictogram: a crossed-out loudspeaker should be understandable across languages.
The last items are in classic menu form. The individual functions can be selected from a list.
The Technology
There is actually not much to say about this. I didn't have to think much about a multi-line LCD display. The options offered by a TFT or Oled display are too diverse. The prices are meanwhile also moderate. So these displays are already available for under 20€ (plus shipping).
I chose a 1.5-inch RGB Oled display, because the power consumption is important. In the end the display is powered by the power supply of the potentiometer. A maximum of 100mA is available here. The version I chose shines with a current consumption of less than 16mA.
The display is controlled by the microprocessor located on the board. The control of the Muses chip represents only a small load for the microprocessor. The additional operation of a display should not be a challenge. The Oled Display is connected with a seven-pin cable. I had already considered the appropriate plug connection when routing the last boards.
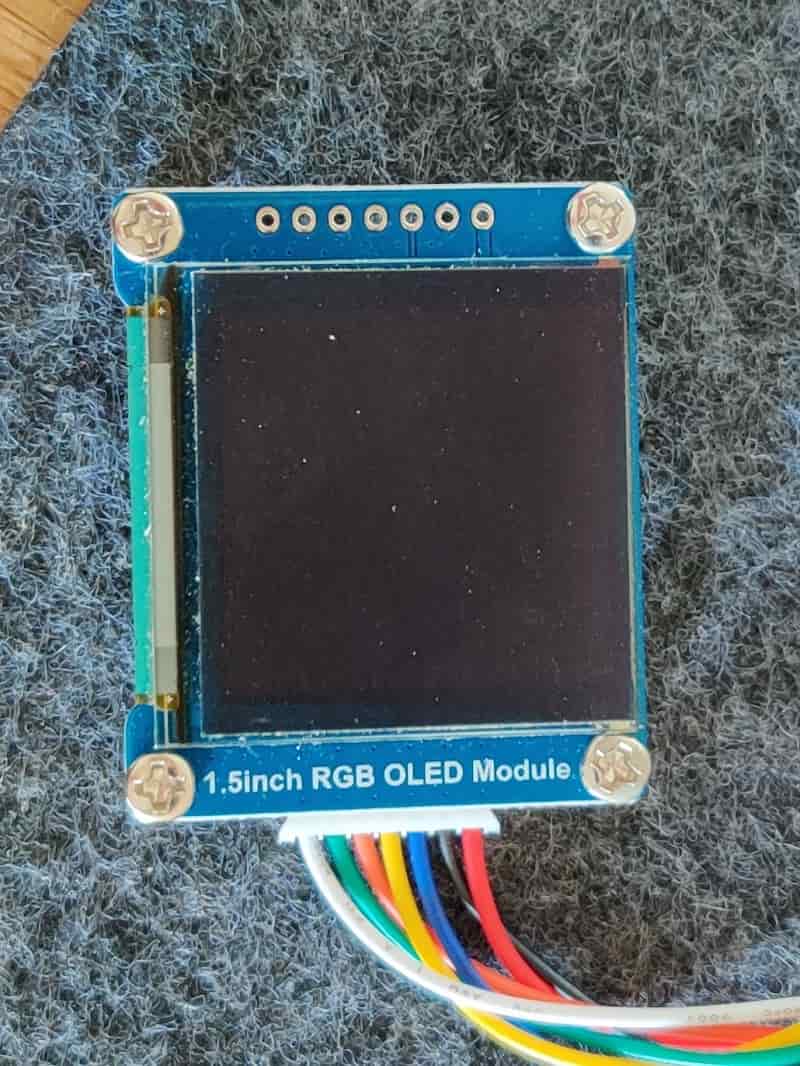
the Oled-Display
1,5 Inch - RGB
- - Display color 65k RGB
- - Resolution 128x128 pixels
- - dimensions 44 x 37mm
- - Viewing angle >160°
- - Supply voltage 3,3V / 5,5V
- - Interface SPI (3- oder 4-wire)
- - visible area 27 x 27mm
The technical data:
27(0.11) x 27(0.11)mm visible area - But this is little. Wrong. Due to the outstanding contrast and the high luminosity all information can be read very well. In retrospect I was surprised myself that the actually visible area is so small.
I would like to make a short comment on the following close-ups of the display. Unfortunately these shots are not very easy. The display offers much more contrast, brightness and color saturation than can be seen on the pictures.
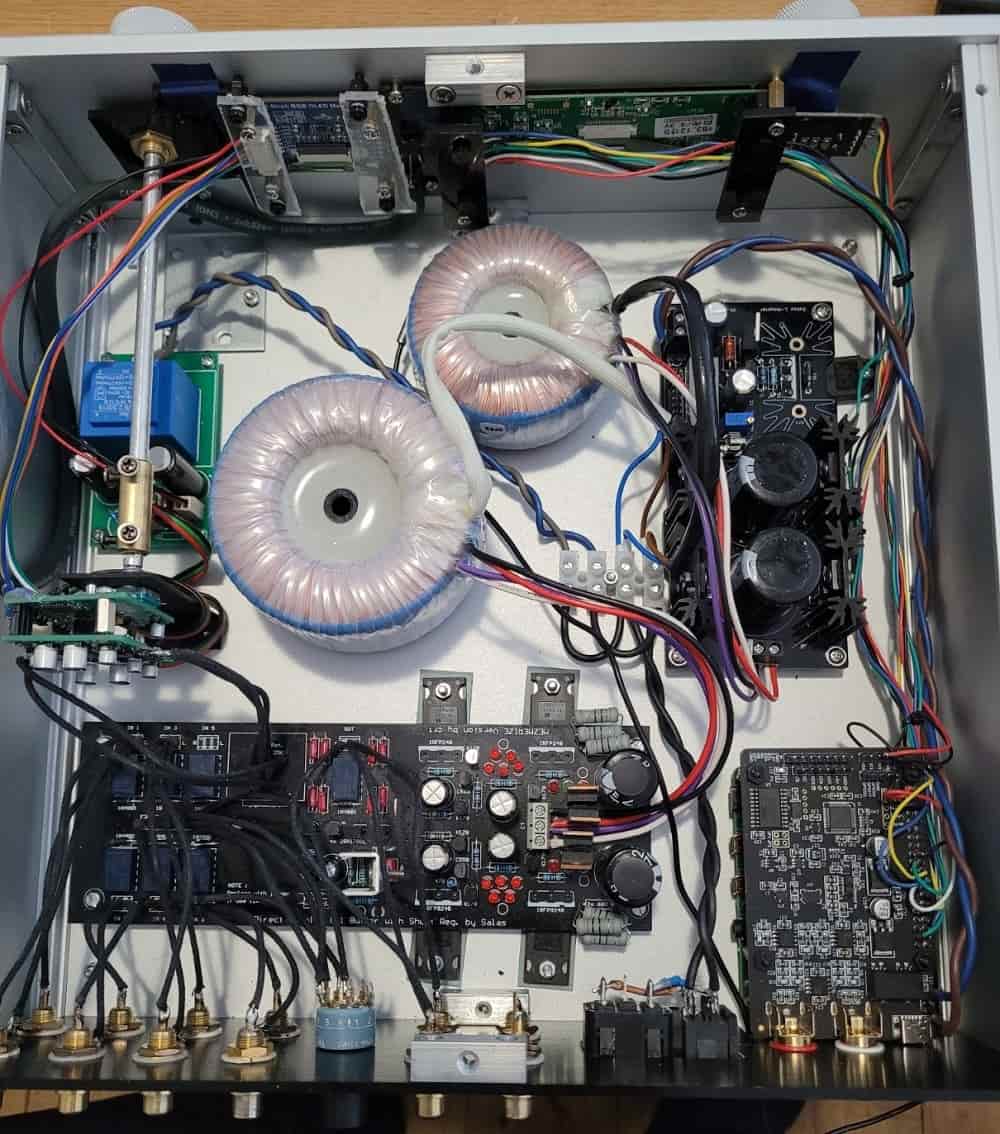
Power Supply
Prototypes
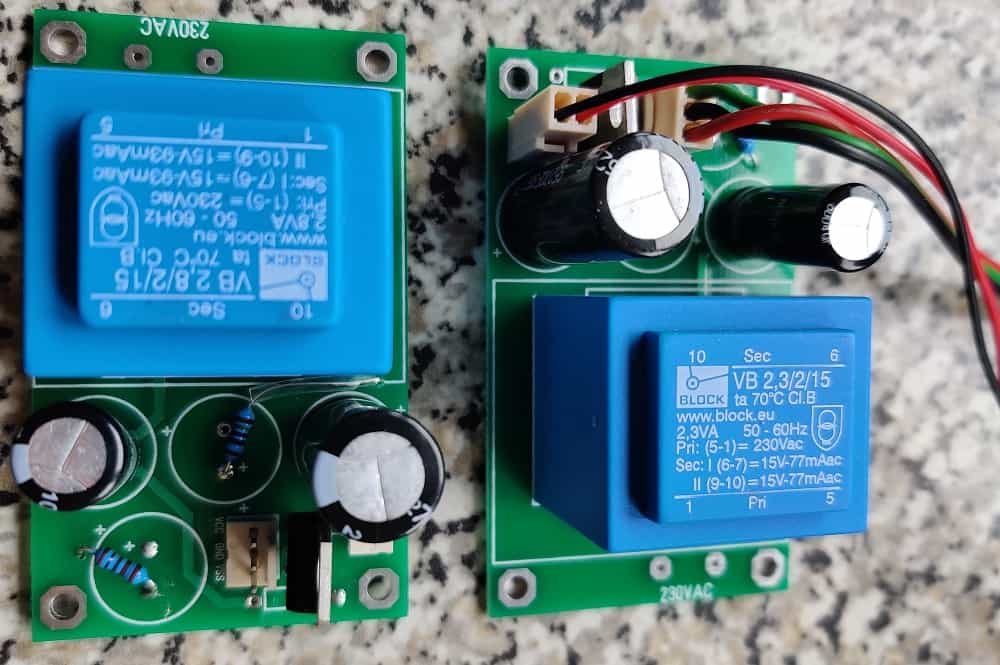
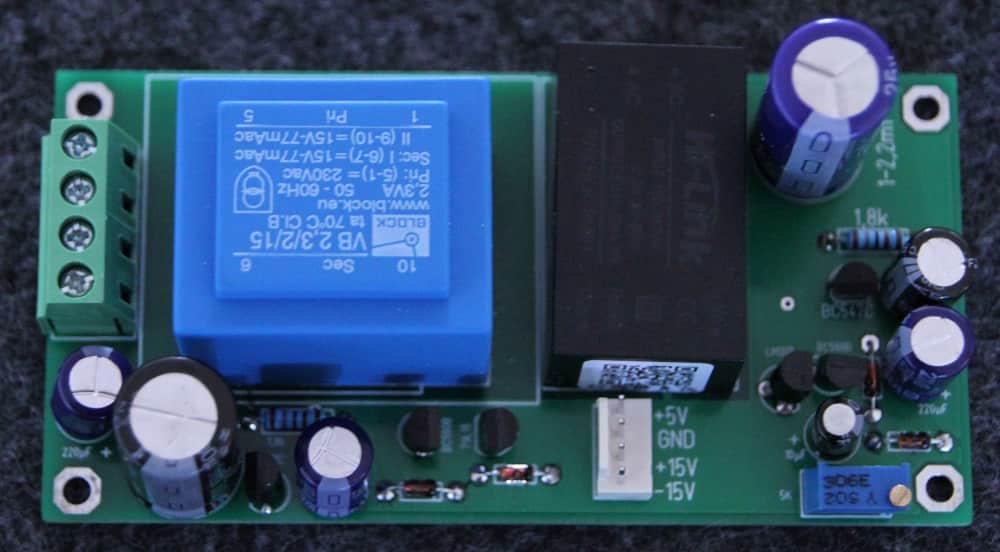
Unfortunately there were some problems with the power supply of the display. I had chosen the Oled because it has a low power consumption and I hoped to be able to use the power supply on the MP board. But there were always some problems, because the power consumption of the Oled display varies depending on the selected screen. This caused the MP to freeze or restart. So I have discarded this solution.
Through an external power supply (+3,3V or 5V) the potentiometer worked as desired. In the end, not quite as elegant, but quite practical, since the potentiometer is designed for internal installation.
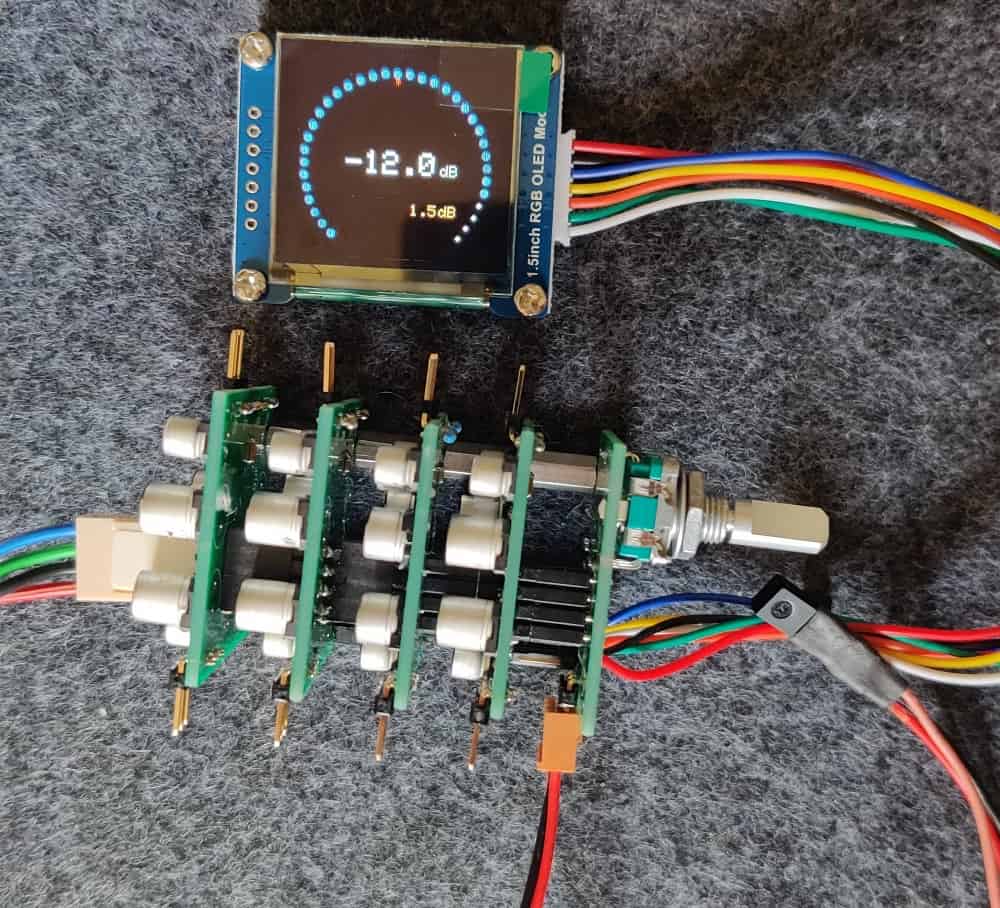
4 X 2
Multichannel-SAP
The order of an 8-channel potis (4x2) brought me to a better solution. An external power supply, which covers all necessary voltages. Only an additional pin header has to be added to operate the potentiometer independently from the power supply of the MP-board. The SAP without Oled is now still supplied by the power supply on the MP board. For the Oled version, the power supply components are simply not installed.
The Software
In the meantime I was worried that the 32kByte internal memory would not be enough for my program. In the end the development took much more time than I thought.
Here are the explanations:
Volume
The volume is shown in dB in the center of the display. This is the value that is actually written to the Muses chip. The white ring consists of 35 dots, which are filled in blue in proportion to the selected volume. The minimalist design can be expanded in the Options menu. More about this later.
Again I used the button of the rotary encoder as the only control element. You will already have noticed that I really appreciate this minimalism paired with a high functionality. The button offers here three different choices:
Mute
everything stands still
Settings
Sound Balance
Balance control
The Mute option offers no further possibilities. Pressing another button, turning the encoder or pressing the remote control will cause the volume to increase smoothly again. Exactly the same way the volume was reduced before: gently!
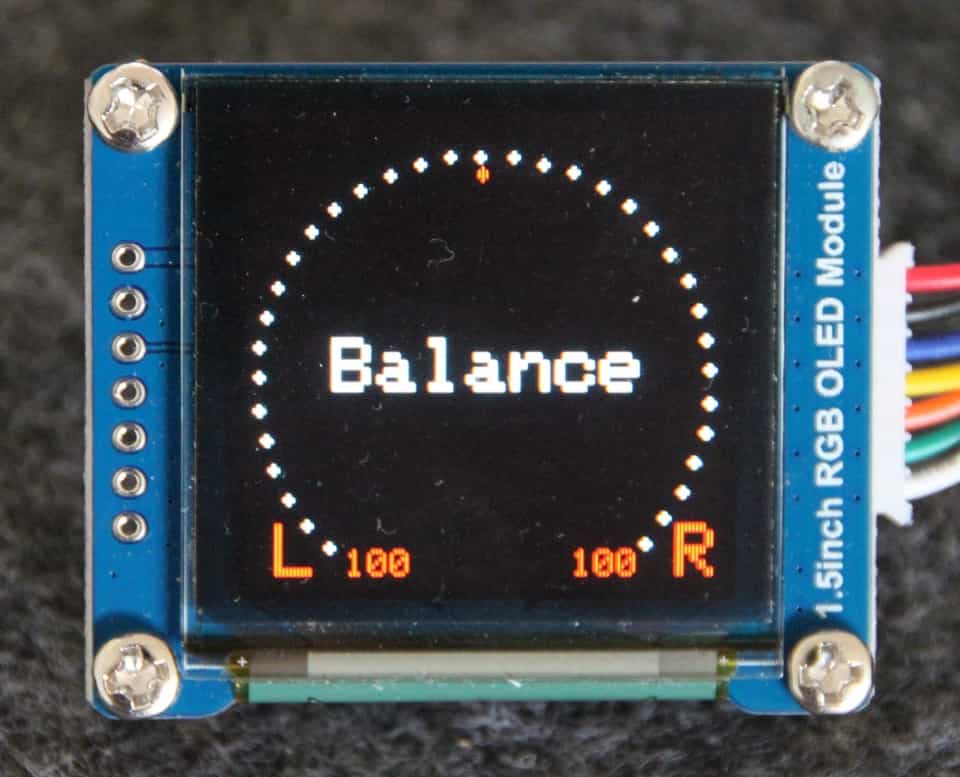
The balance control works in 1% steps. The respective value is displayed in percent at the bottom right or left. The red dot visually indicates the percentage ratio. This item can be configured in the Options menu so that it is permanently displayed in the main menu.
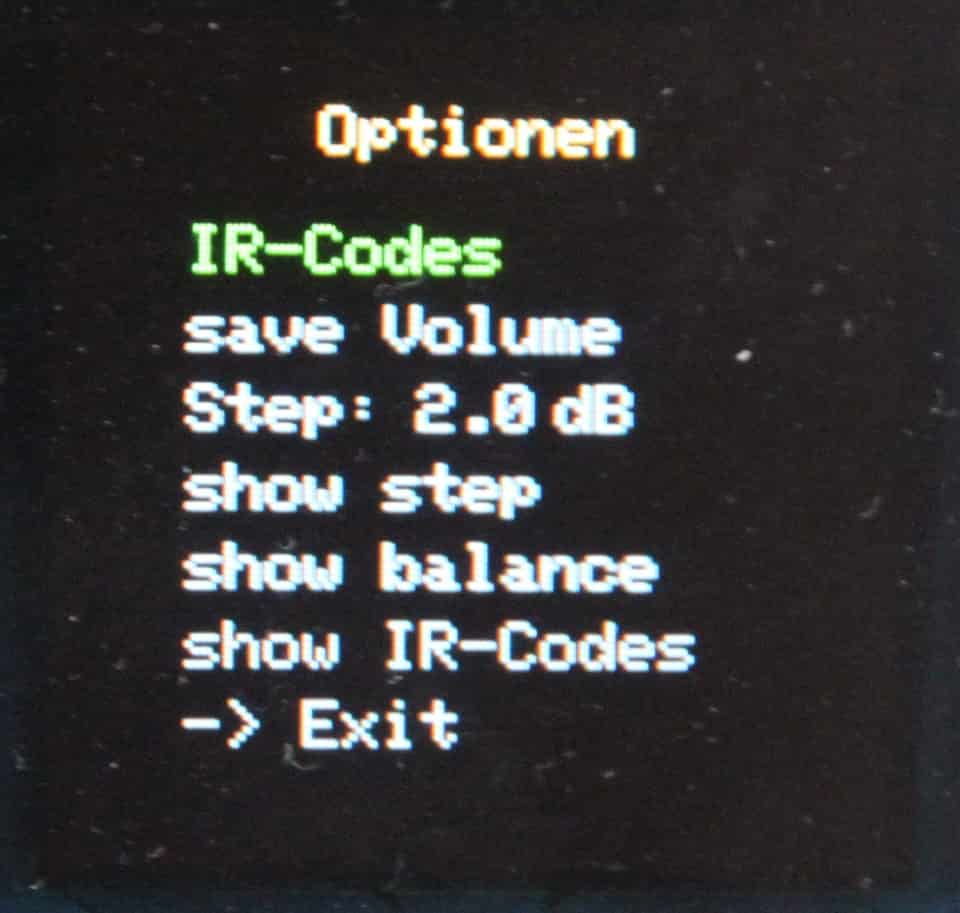
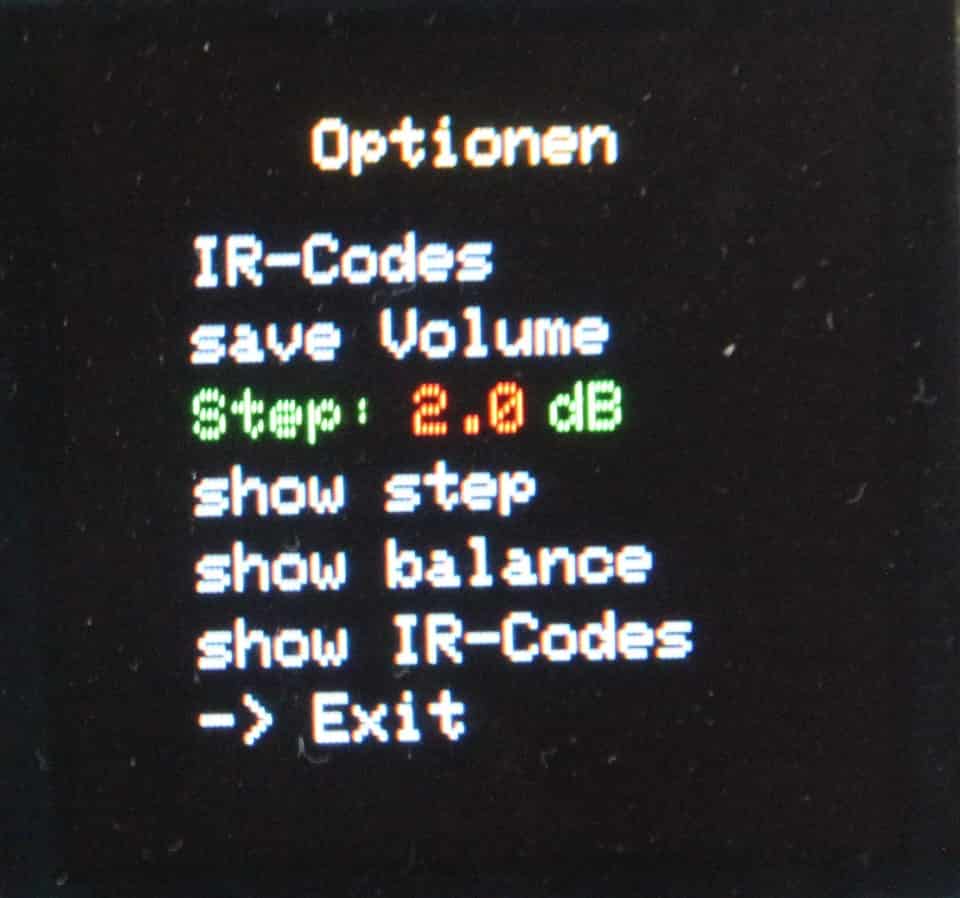
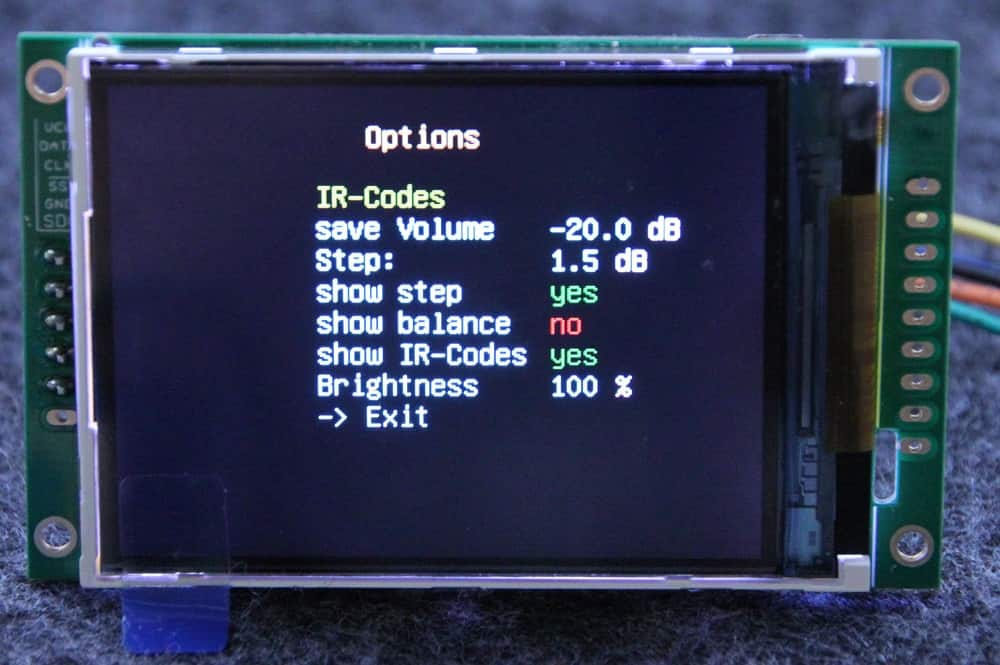
Das Optionen Menü
The following options are available here:
- IR-Codes
- save Volume
- Step: xx dB
- show step
- show balance
- show IR-Codes
- -> Exit
Turning the encoder will "highlight" an entry. By pressing the button the corresponding entry is selected.
IR codes: A new page opens here. The keys to be programmed are queried individually. Proper reception of the IR codes by pressing the remote control brings the next button to be programmed to the display.
Options
IR Codes
Important note:
You can only leave the IR code menu by programming. If your remote control does not work with the sensor, only a restart of the potentiometer will help. The same happens if you accidentally enter the menu. Of course you can also simply program the codes again.
save Volume - Selecting this entry will directly save the current volume as power-on volume. Any previously selected balance change is taken into account.
Options
the Step
Step: xx dB - Here you can set the so-called Step between 0.5 and 2.5dB in 0.5dB steps. I introduced this function because the range of 111.5dB in 223 steps is very large. In the standard case with a 30-pulse rotary, more than seven complete rotations have to be executed to regulate from "very quiet" to "very loud". With this function the sensitivity of the potentiometer can be adjusted to your own needs.
Pressing the button allows the step to be adjusted. This can be adjusted with the Rotary control knob. Pressing the button again saves the selected setting.
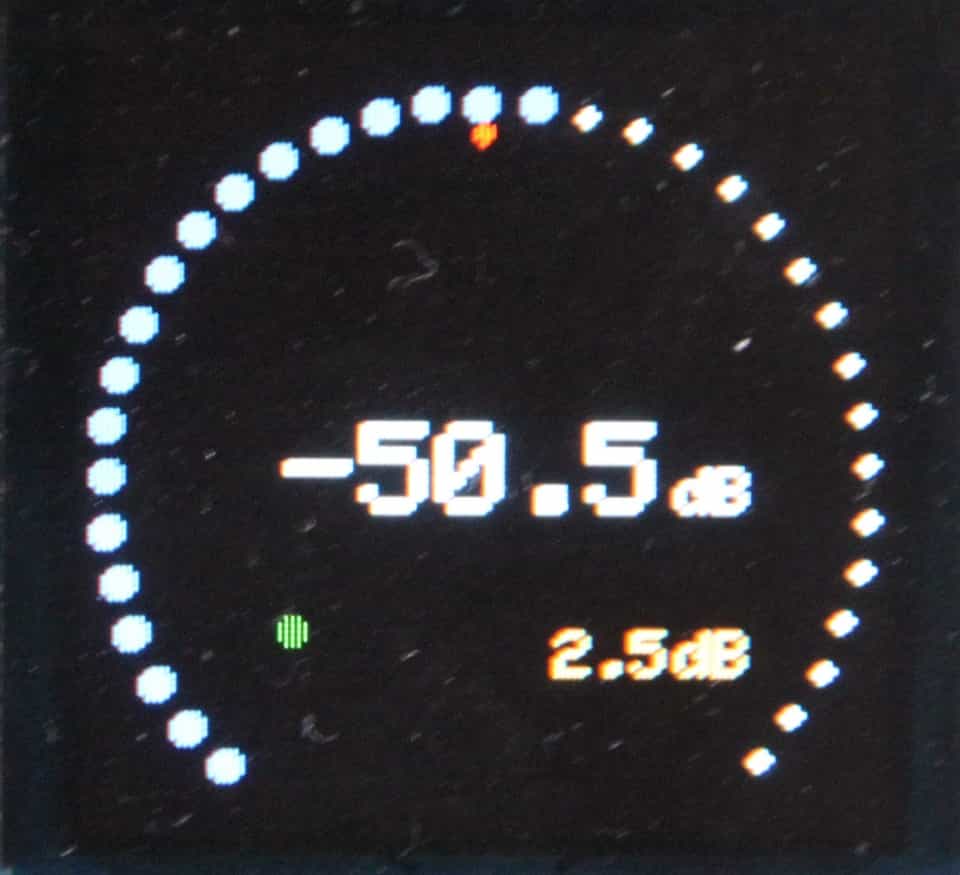
Balance/Step/IR reception
the basic display
show step - The previously explained step function can be displayed in the main menu as an info element. Selecting the "Yes" option will display the corresponding dB value in the main menu (bottom right).
show balance and show IR-Codes - These settings can also be displayed in the main menu. The balance display appears as a small red dot, exactly as it was selected in the balance menu. The selection of IR codes causes a small green dot to light up briefly in the lower left corner whenever the Vol+ or Vol- button on the programmed remote control is pressed.
The selection of the "show elements" is self-explanatory. After exiting a menu item, a short message is displayed to remind you to save the selected option.
Otherwise, all that remains to be said is that all selected options are permanently saved. After a restart of the potis/device they are available again as they were selected.
An example for installation
At the company Canon I discovered the following variant for a printer: The display was glued behind a acrylic glass pane. This was then painted in such a way that only the visible area of the display was visible. The pane with the display was embedded in the cover of the printer. I found this solution very professional and at the same time easy to realize.
On the Renovatio page there are a few more ideas on how to place this display in a front panel.
My intention was to hide the display behind a round cutout. I have seen this solution on another device and found it very successful. No display elements would be hidden either. For this reason, the software was programmed in such a way that the displayed information is located within a circle.
Here is the solution from Klaus in Denmark:
perfect installation
The outside view
professional look
Klaus: It looks fine on the outside. So i'm happy about the finished product.
It's almost silent. I was a little worried because there isn't much room in the chassis. But everything worked out great. Only thing that isnt the best, is the choice of remote. Some remote like the apple etc, its not happy about, but the tv remote, it works great with.
Developer's note: The problem with the usability of Apple remote controls has been fixed.
Updates
PS Upgrade
noise figure -110dB
The power supply has now received an additional screening. It now offers a noise figure of less than -110dB.
The software also received an improvement:
When pressing the encoder (button), the possible submenus are displayed during the printing time. Now you only have to release at the correct position. Then the corresponding submenu is called up.
- IR codes - All buttons that can be programmed are now displayed beforehand. After programming has been completed the corresponding entry is displayed in green.
- Save volume - The volume is always displayed in the menu and can now also be changed here.
- show step - The default setting is displayed.
- show balance - The default setting is displayed.
- show IR codes - The default setting is displayed.
Update from 16.03.2021:
The software for recognising the IR signals has been expanded; the unit can now also be used with Apple remote controls.
A 2.4-inch TFT display is now also available. This is a module from the company Digole. The modules are bright and offer a high contrast. Although these modules are relatively expensive, they have their own microprocessor on board, which significantly reduces the load on the MP that controls the Muses chip. Another advantage is that the brightness of this module can be adjusted by software.
2.4 inch TFT
Fa. Digole
includes a MP
SE Volume Control
with adv. power supply
In the meantime, I have tested the serial TFT modules that are currently spilling over from China for just a few euros. However, the image quality is much lower. And if you use an 8-bit MP, the image build-up takes a very long time. Not to mention the size of the software. The memory of the Atmega 328p is overfilled relatively quickly.
Downloads